Install CPS Software
The first thing you need to do is install the CPS software to your computer.
1. Open your web browser and go to www.einstruction.com
2. On the home page top pull-down menu, select “Support" and then "Downloads.”
1. Open your web browser and go to www.einstruction.com
2. On the home page top pull-down menu, select “Support" and then "Downloads.”
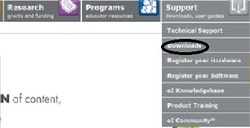
3. This will direct you to the webpage where you will click on “Downloads”.

4. Scroll down the page until you see:

5. Click on the download button and follow the prompts to install.
6. You must accept the license agreement to complete setup.
7. The installation wizard will complete the process after a moment or two.
8. After CPS is installed on your computer, you will have a round blue icon on your desktop with an eI logo on it.
9. Remember to update your CPS software as you receive notifications from eInstruction.
Congratulations! You have successfully installed the CPS software onto your computer. Now it's time to create a CPS database. Please click on the NEXT button to continue.
 |
 Page 3 of 21
|